6833 Whitneyville Ave SE, Alto MI 49302 * (616) 868-6676 * CountryHarvestGreenhouse.com

Saturday, December 22, 2012

Homemade Jelly Candies

The hardest part of this delightful recipe is keeping the jelly from sticking to everything during the cutting stage.  Liberal amounts of sugar on all surfaces will help prevent sticking.

Note: this recipe takes some time, so be sure to plan ahead!


Ingredients

2 - 3 oz pkgs flavored jello (not sugar free)
2 packets unflavored gelatin
1 1/3 cup applesauce
1 tsp lemon juice
2 cups sugar
More sugar for coating candy, about 1/2 to 1 cup


Making the jelly:

Spray a 11x7 pain with nonstick spray. Put in fridge to chill.

Combine all ingredients in a sauce pan.  Let sit 1 minute.  Then, bring to a boil over medium heat, stirring often.  Boil 1 minute, stirring the whole time.

Pour immediately into prepared chilled pan.  Refrigerate for 4 hours. 


Cutting the jelly:

After 4 hours, remove from fridge, and sprinkle sugar on the surface of the jelly, gently spread to coat.  Run a knife along edges to loosen jelly (wet knife if needed).  Gently pull up from pan (I found a small metal spatula helps). 

Turn out onto a surface that has been coated in sugar.  I've found my large plastic cutting board works great.  Just make sure it's coated in sugar to prevent sticking.

Sprinkle plenty of sugar in the bottom of the 11x7 pan you just pulled the jelly from.

Now, either cut into cute shapes with little cookie cutters, or use kitchen shears (or a knife) to slice into little cubes.

Toss cubes in sugar to coat all sides.  Cut and coat all pieces of the jelly and place black in 11x7 pan.  You can also place spaced out on a cookie sheet if you want to.


One last step:

Leave jelly candies sitting in pan on your counter, uncovered, for 8 hours or overnight.  Then, store them sealed.


Tips:
  • Using 2 packages of the same flavor of jello will provide a more intense flavor.  Mixing will muddle the flavors more.
  • Try using flavored applesauce.  I combined cherry jello and cinnamon applesauce.  The cinnamon wasn't too strong, but you could taste it.
  • There are tons of jello flavors!  Have fun and get creative.
  • This makes a fantastic gift -- people will be impressed because homemade jelly candies are not as common as cookies or fudge, for instance.

Monday, September 17, 2012

Out of This World Apple Preserves

The lemon keeps this sweet, chunky jam fresh-tasting.  It reminds me of apple pie or applesauce.  It's really just perfect, and seriously out of this world good!

I made mine with Honey Crisp Apples, but you can use any kind. 

6 c. chopped, peeled & cored apples
1 c. water
1 T. lemon juice
1 package pectin
4 c. sugar
1/2 c. thinly sliced lemon
2 t. nutmeg

Combine apples, water, and lemon juice in a large non-reactive pot.  Cover and simmer 10 minutes.  Add in 1 package of pectin.  Stir and bring to a boil.  Add sugar and lemon.  Stir until sugar is dissolved.  Bring to a boil.  Boil hard 1 minute, stirring constantly.  Remove from heat and stir in nutmeg.

Ladle into prepared jars, leaving 1/4 inch head space.  Process 10 minutes in hot water bath.  Makes 6-7 half pints.

New to canning?  You CAN do it!  Ball makes it really easy -- go here to learn more.

Monday, August 13, 2012

Favorite Things: Mrs. Wages Seasoning Mixes

It's no secret around these parts that I have really jumped into canning these past couple of years. I love preserving produce from our garden and making tasty treats for my family: spiced peaches, salsas, pizza sauces, applesauce, pickles ... and, of course, jams! Jessica's Pantry at the store is filled with a wide variety of my jams. But it's my basement shelves that see the true bounty. 

My not-so-secret weapon for preserving a flavorful harvest: Mrs. Wages seasoning mixes.  The easy-to-follow directions and flavorful seasonings take a lot of time and guesswork out of making fantastic canned goods.  Directions for immediate eating or preservation by refrigeration-only, freezing or canning are all provided on the package.  For the beginner like me, Mrs. Wages seasonings make things easier as you grow accustomed to the canning and preserving process. 

So far, I we have tried Mrs Wages Pizza Sauce, Medium Salsa, Spiced Peaches, and Refrigerator Pickles and my family has loved each!  I am a huge fan of the pizza sauce and made sure to can two batches this year since we ran out last year and I was bummed.

You can find the seasonings at your local grocer (for me, that's Meijers), right along with the plethora of canning products available this time of year.  Or, you can shop Mrs Wages online store.  Prices seem pretty comparable - especially when you consider shipping costs.  (Though if you go here and scroll to the bottom they do have some specials going on.)

Enjoy and happy harvesting (and preserving!).


Saturday, July 21, 2012

Two Impossibly Easy Dips

My family has come to know me as the dip queen.  No chip, no veggie stick, no vanilla wafer should go undipped.  And so, I have added a line of dip mixes to Jessica's Pantry at Country Harvest Greenhouse.  However, the dips I'm sharing don't start with a seasoning mix -- instead, look to the canned jam section of Jessica's Pantry.

Berry Delicious Dip
- 1 cup Triple Berry (or other fruit) jam
- 1 cup marshmellow creme

Mix well -- a mixer will be needed -- and voila!  Instant delicious fruit or cookie dip.  You can choose the jam flavor you want and you can alter the ratio of jam-to-creme based on your tastes.

Hot Pepper Dip
- 8 oz cream cheese, softened
- 1 cup hot pepper relish

Mix well.  Creates a creamy, savory dip with a hint of sweet and a hint of heat.  Serve with crackers or veggie sticks.

Monday, June 4, 2012

Strawberry Rhubarb Jam

It's that delightful time of the year when rhubarb and strawberries are in abundance.  Here's a tasty way to make use of the bounty!  

Recipe yields 6 half pints


2 c. crushed strawberries
2 c. chopped rhubarb
6 Tbs pectin powder
1/4 c. lemon juice
5 1/2 c. sugar

Before you begin, prepare your hot water bath, jars, and lids.  Ball Canning provides an excellent step-by-step for this.

Next, prepare and measure out all ingredients.  (When it comes time to add the sugar, you will want to be able to dump it right in.)

Combine strawberries, rhubarb, pectin and lemon juice in a large saucepot.  Bring to a boil over high heat.  Once a full boil is reached, add the sugar, stirring until dissolved.  Return to a rolling boil.  Boil hard for 1 minute, stirring constantly.  Remove from heat. 

Skim foam if necessary.  Ladle hot jam into hot jars, leaving 1/4 inch headspace.  Adjust 2-piece caps.  Process 10 minutes in boiling water canner.

TIPS:
  • Use a liquid measuring cup for strawberries and lemon juice to ensure accuracy in measuring.
  • Fresh lemon juice is best, but not vital.
  • You may want a potholder in your hand when you stir the boiling jam - it bubbles & spits.
  • A dab of butter added in during the boiling will reduce foam.

Recipe source: Ball Blue Book Guide to Preserving
Image source: Kraft.com

Saturday, May 5, 2012

Favorite Things: Meet My Very Good Friend Phil (odendron)

I thought it would be fun to do a series on my favorite things - plants, recipes, and otherwise.  To launch this series, I present to you my best bud Phil.

Phil is a philodendron tropical plant, or as I like to call it - a "No-Kill 'Um" plant. 

Which means -- just as it sounds -- it is very, very difficult to actually kill one of these hardy plants.  Outside of jade plants, philodendrons are the most fantastic, forgiving plants it has been my great pleasure to know. 

Not only can they survive in low light and with sporadic watering, they are fantastic climbers and prolific viners and it's quite fun to wrap their vining branches in and around your decor. 

Another fun thing you can do: snip a few philodendron vines and keep them in water indefinitely. They make lovely windowsill gardens or bookshelf decorations.

Trust me, novice and forgetful plant-keepers will find philodendren to be a fun and easy way to green up your living space. I hope you stop by Country Harvest Greenhouse and pick up your very own "No Kill 'Um" and give it a try!


Tuesday, April 24, 2012

Cactus Garden -- 2.0

My mid-winter blahs were staved off in January by creating a darling trio of cactus plantings:

But now, a few months later, I felt the inevitable desire for variety, plus a developing obsession with all kinds of succulent plants.  Thus, I took the plants from the trio of containers and combined them into this miniture garden with 5 kinds of succulents:


I find it to be too cute for words! 

You can make your own with a small container, rocks in the bottom for drainage, and a few small succulent plants.  Give it a try -- I think you'll like it!

Friday, April 20, 2012

Roasted Kohlrabi


Ingredients

4 kohlrabi bulbs, peeled
1 tablespoon olive oil
1 clove garlic, minced
salt and pepper to taste
1/3 cup grated Parmesan cheese

Directions
1. Preheat an oven to 450 degrees F (230 degrees C).
2. Cut the kohlrabi into 1/4 inch thick slices, then cut each of the slices in half. Combine olive oil, garlic, salt and pepper in a large bowl. Toss kohlrabi slices in the olive oil mixture to coat. Spread kohlrabi in a single layer on a baking sheet.
3. Bake in the preheated oven until browned, 15 to 20 minutes, stirring occasionally in order to brown evenly. Remove from oven and sprinkle with Parmesan cheese. Return to the oven to allow the Parmesan cheese to brown, about 5 minutes. Serve immediately.

Monday, March 5, 2012

Kitchen Storage

The spice cabinet can be one of the most frightening and fantastic places in the kitchen.

It used to be that I'd open the door and haphazard stacks of containers of all shapes and sizes filled with a wide array of spices would all beg for my attention. The chaos was a tad overwhelming! I have 25 to 30 spices (and I'm not even that adventurous of a cook -- no cayenne and no curry, for example) and that is a lot to wrangle in one small space.

Finally frustrated with the mess of spice bottles of every shape and size, I recently invested in a storage system that I'd already been using elsewhere in my pantry: the ever-handy and versatile mason jar.

The jars offer a consistent size and a stable surface for stacking, plus their airtight lids preserve freshness and keep out pantry pests.

Here's what I did:


  • I used pint jars for the items I keep a large amount of (I like to buy in bulk), all the way down to the 4 oz half jelly jars for the spices I keep just a bit of.
  • Ball sells storage caps, which are perfect and easy to use. You can buy them online, but I find the prices are just as good or better at your local hardware store.
  • I labelled the jars using my Dynamo LetraTag labeller - one of my best investments! You can also use tape and a permanent marker or office labels. Make sure you note any special instructions or cooking ratios that the spice may have.

    Tip: You can find mason jars at garage sales and second-hand stores. But they are pretty scarce and it's probably easier to by a package of them from the store.
  • Sunday, February 19, 2012

    Savory Green & White Soup

    This two-tone soup is filled with the great healthy benefits of veggies (including super-star kale), plus the savory goodness of chicken. If my powers of deduction have not failed me, it is also very low carb.

    - 1 large skinless, boneless chicken breast (about 2 cups cooked chicken)
    - 1 medium onion, chopped
    - 2 celery ribs, or the inner ribs and leaves from the celery bunch, chopped
    - 2-3 large kale leaves (or about 1 cup) chopped
    - 16 oz bag frozen broccoli & cauliflower blend, roughly chopped
    - 32 oz light chicken broth
    - chicken bullion (optional)
    - water (about 2-3 cups)
    - olive oil

    Cook the onion and celery in a large stock pot over medium heat for about 3 minutes. Add in the kale and cook another 2 minutes. Pour in the chicken broth and bring to a simmer. Add the chopped chicken, bullion if you wish, and 2-3 cups of water. Season with salt and pepper. Simmer until heated through, then put in the broccoli and cauliflower. Simmer until hot, or longer, to deepen the flavors.

    Serve with a sprinkling of finely shredded cheddar cheese, if desired.

    Note: I choose to par-boil the chicken breast separately, then add it to the soup to boil longer. I used the broth from the boiled chicken and put that into the soup (after attemping to skim some of the fat). You could just add all chicken broth, or broth and water. Whatever works for you!

    Thursday, January 19, 2012

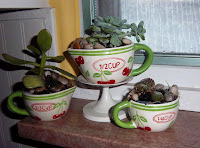
    A Cup O' Cactus

    Feeling the winter blahs? I know I am! When summer is a distant memory, and spring seems be running away from you, it's time for a little indoor greenery.

    Windowsill gardens are the perfect idea for a little mid-winter burst of cheerful green. You can make a variety of windowsill gardens, anything from spring bulbs, plant cuttings, herbs, cacti, small tropical plants, and more.

    This year, I had a fun little project in mind involving some adorable ceramic measuring cups my mom had given me. I just knew they would be perfect to create a little windowsill garden vignette.


    I think I was right. What do you think?

    This is how I made it:

    Gather:
    - a small, sturdy dish (teacups would be cute)
    - potting soil
    - small plants (I used succulents, see note)
    - plastic containers to line, if desired (I used Gladware and tiny plastic cups)
    - small stones

    1. If you choose, cut your plastic liner to fit your dish, so that the top of it is flush with the rim of your dish.

    2. If it is deep enough, place a few stones in the container to aid with drainage. If it's not deep enough, that's OK. Just be careful not to over-water).

    3. Fill the container part-way with soil, place your plant inside, and then gently pack soil around the plant.

    4. If you like, place small stones on top of the soil around the base of the plant. They can help cover the rim of your plastic liner if it is showing.

    Here are some other great examples: Desert in a Box, and Plants for the Sill.

    Note on plant choice: You can use a variety of house (tropical) plants or herbs for this project. The main consideration will be the size of your container. If the container is too small, you won't be able to find a plant small enough. I was able to make my plants fit in very small dishes because I choose to make a succulent (cactus) garden. Succulents have very shallow roots, which allows them to be placed in small, shallow pots.

    Monday, August 8, 2011

    Hot (& Sweet!) Pepper Jam


    Using different colored peppers makes it pretty but you can use all green if that's what you have. **Remember to protect your hands with rubber gloves or baggies when handling jalepeno peppers to prevent burns.**

    3/4 c. finely chopped jalepeno peppers (roughly 6 medium peppers)
    2 c. finely chopped green, yellow or red bell peppers
    1 1/2 c. cider vinegar
    6 1/2 c. sugar
    1 pouch Certo LIQUID pectin
    1 TBS butter or margarine

    First, prepare your jars. Visit the Ball Canning "Getting Started" page to learn more.

    Carefully measure peppers, vinegar and sugar into pot. Stir. Add 1 tablespoon of margarine to cut down on the foam that forms in the cooking process. Bring mixture to a full rolling boil and add the pouch of Certo quickly, stirring continuously. Bring it back to a rolling boil and boil exactly 1 minute still stirring continuously. Remove from heat and skim off any foam from the top of mixture. Ladle into jars. Process jars for 10 minutes in canner.

    Divine over cream cheese and served with crackers.

    Notes:
    - More great recipes on Ball Canning's website
    - You can add a few jalapeno seeds for extra spice
    - You don't have to use Certo pectin, but if you switch, be sure to check the exact measurements listed on the package directions. It's important to be exact in your measurements.

    Special thanks to my mom's friend Eileen for sharing her preferred recipe!

    Sunday, July 24, 2011

    Refrigerator Pickles


    Now is the perfect time for crisp, crunchy baby cukes and large, lovely dill plants.

    It was a snap to put this together, providing a quick and easy alternative to canning the pickles.


    1 c. water
    1 c. distilled white vinegar
    1 c. sugar
    1 1/2 t. natural salt
    1 lb pickling or baby cucumbers, trim ends and quarter lengthwise
    8 cloves garlic, peeled
    2 t. black pepercorns
    2 seed heads fresh dill, with some of the stalk

    Combine the water, vinegar and sugar and salt in a saucepan. Bring to a boil on medium-high heat. Stir until the sugar and salt dissolve. Let cool to room temperature.

    Pack the cucumber spears in the jars. Divide the garlic and peppercorns between the jars. Stuff a large dill seed head into the center of each jar. Pour the cooled liquid over the mixture, making sure everything is completely covered with liquid. Seal the jars and refrigerate for 24 hours before using. Keep refrigerated; flavors will continue to develop overtime.

    Makes 2 pint jars.

    NOTES:
    - For fun, I cut some cucumbers in rings and some in spears, making 1 jar of each kind.
    - This depends on having fresh, crisp cucumbers for best results.

    Monday, July 11, 2011

    Best Ever Zucchini Bread


    This amazing, tried and true recipe always gets compliments. I've tested many zucchini recipes in my day, but none are as moist and delicious as this. The cinnamon adds a very nice flavor to the bread. This recipe is excellent for freez and gifting!!


    3 eggs
    1 c. cooking oil
    2 c. white sugar
    2 c. peeled shredded zucchini
    3 t. vanilla
    3 c. flour
    1 t. salt
    1 t. soda
    3 t. cinnamon
    1/4 t. baking powder

    Beat eggs till foamy. Add oil, sugar, zucchini and vanilla. Mix lightly but well. Add flour, salt, soda, cinnamon, and baking powder. Mix together and divide batter into 2 greased loaf pans. Bake at 325 degrees for 1 hour.

    Notes:

    - It also works well with yellow squash instead of zucchini.
    - Drain your zucchini some before mixing in, but don't worry about it too much.
    - I've subsituted with Splenda for Baking and applesauce instead of all or half the oil and been happy with the results.

    Thursday, June 9, 2011

    Amish Potato Salad


    Not the least of the reasons why I love the Amish is their amazing ability to cook delicious food. It's not quite potato season, but I couldn't resist sharing this simply divine recipe.


    6 c. cooked potatoes (I've used russet and yukon gold)
    6 hard boiled eggs
    1/4 to 1/2 c. onion, finely chopped
    1 c. celery, finely chopped
    1 1/2 c. mayo
    3 t. mustard
    1 1/4 c. white sugar
    1/4 c. vinegar

    Boil potatoes and cube. Set aside 1/4 of the potatoes, mash the remaining 3/4 of the potatoes. Gently mash eggs as well, careful to mash too small. Put all the potatoes, the eggs, celery and onion in a large bowl. Combine mayo, mustard, sugar and vinegar. Mix well. Pour over the potato mixture. Stir well. If you like, slice one or two eggs to place decoratively on top, sprinkle with paprika. Chill. Will keep 4-5 days.

    PS: I halved this recipe from the original in my Amish cookbook. Seriously, I think it was for a potluck or a family much larger than mine.

    Monday, May 23, 2011

    DIY Basic Cookie Mix + 3 Yummy and Easy Cookie Variations


    These recipes came from one of my many Gooseberry Patch Cookbooks. Their recipes are always tried and true country favorites and so delicious! As the name of the cookie mix implies, the mix makes a great gift.

    THE MIX: Kate's Cheerful-Giver Basic Cookie Mix
    8 1/2 c. flour
    2 c. brown sugar
    2 c. sugar
    1 3/4 c. dry milk powder
    3 T. baking powder
    1 1/2 t. salt
    3 1/2 c. shortening (one that doesn't need refrigeration)

    Combine first six ingredients in large bowl. Using two knives or a pastry blender, cut in shortening until mixture is crumbly. Store in an airtight container 8-10 weeks in refrigerator. For slightly longer storage, store mix in freexer. Yields about 17 cups of mix.

    OPTION #1: Grandma's Gran-Oatey Cookies
    2 1/2 c. cookie mix
    2 T. brown sugar
    1 t. cinnamon
    1/2 t. nutmeg
    2 eggs
    1/2 c. milk
    1 t. vanilla
    3/4 c. oatmeal
    1/2 c. granola

    Mix together cookie mix, brown sugar, cinnamon and nutmeg. Beat in eggs, milk and vanilla. Add oatmeal and granola. Let stand for 15 minutes to allow oatmeal and granola to absorb moisture. Bake at 350 for 9 to 11 minutes on greased baking sheet. Cook on wire rack.

    OPTION #2: Lunch-Pail Peanut-Butter Cookies
    3 c. cookie mix
    3/4 c peanut butter
    1 egg
    1 T. water
    3 T. brown sugar
    1 t. vanilla
    1/2 c. unsalted peanuts, chopped
    1/2 t. cinnamon (optional)

    Mix all ingredients together. Drop by teaspoonfuls on an ungreased baking sheet. Make criss-cross pattern with tines of fork on each cookie. Bake 10-12 minutes at 375 or until light golden brown. Cook on wire racks.

    OPTION #3: Two-Times Chocolate Chippers
    3 c. cookie mix
    1/4 c. milk
    1 egg
    1 t. vanilla
    2 oz. unsweetened chocolate, melted and cooled
    1/2 c. semisweet chocolate chips
    1/2 c. nuts, chopped

    Mix together cookie mix, milk, egg and vanilla. Stir in melted chocolate, chips and nuts. Drop by teaspoonfuls onto a greased baking sheet. Bake at 350 for 9 to 11 minutes or until done. Cool on wire racks.

    Sunday, May 1, 2011

    Make Your Own Laundry Soap


    Making your own laundry soap is much easier thank you might think -- and it's super-cheap! You just need a few ingredients and a food processor and you're good to go.


    Ingredients:
    - bar soap *see note below*
    - Washing soda - not baking soda
    - Borax

    Tools:
    - large container to store your soap
    - Measuring cup
    - Large mixing bowl
    - Food processor

    Making Your Detergent:
    Your mixing ratio is simple: 1 bar of soap (or 2 cups soap shreds) to 1 cup Borax and 1 cup Washing Soda.

    1. Grate your soap using your food processor or a hand grater. The finer the shreds, the better.

    2. In large mixing bowl, combine 2 cups soap shreds with 1 cup Borax and 1 cup Washing Soda. Mix well.

    3. Scoop your the soap mix into the food processor and use the chopping blade to finely pulse the soap mix. You want the soap shreds to mix well with the Washing Soda and Borax, and create a fine crumb-like mixture. Once finely processed, transfer to your container for storage.

    4. Continue through remaining soap shred mixture in bowl, until all have been finely processed and well mixed with the Borax and Washing Soda. Transfer to your storage container as each batch is finely pulsed.

    Using the Detergent:
    When washing, use about 1/8 cup for medium loads and 1/4 cup for large loads. This soap does not bubble, so don't be alarmed when you don't see suds! Also, note the type of bar soap you use will have different stain-removal properties. Use Fels Naptha if you rely solely on your detergent for stain-fighting.

    Soap Suggestions:
    Ivory is a good choice, but I've been known to use whatever blows my hairback when I'm shopping. For the all natural route, you can choose Dr. Bronners bar soap, but at $4+ a bar, it is too rich for my blood. Other options are Fels Naptha (great for stain removal) or Zote.

    Tuesday, April 26, 2011

    Project for Kids: Create a Worm Farm


    This is a fun, educational and inexpensive project that demonstrates how earthworms move about in the soil. Earthworms are very helpful in gardens because they move about and all air and water to reach all parts of the soil, which is beneficial to plant roots.

    Materials for the project:
    * Large glass jar with a lid
    * Hammer and nail
    * Soil
    * Sand
    * Oatmeal
    * 2 or 3 earthworms
    * Black construction paper

    Directions:
    1. Add some water to the dry soil and sand, just enough to make them moist.
    2. Pour about 1 inch of soil into jar. Sprinkle on a teaspoon of oatmeal. Cover with about an inch of sand. Repeat layers until you are within about 2 inches of the top of the jar.
    3. Poke a few holes in the lid of the jar.
    4. Place worms in jar and secure lid.
    5. Wrap construction paper around jar to provide a dark environment for worms. Place in dark place, out of direct sunlight.
    6. In a week or so, remove the paper and check out what the worms have been up to! They should have made tunnels through the sand and soil, looking for the food (oatmeal)... just like worms do in our garden soil, mixing and airating.

    Maintenance:
    * Every week, add a little water to the jar to keep it moist.
    * Every six weeks, add a teaspoon of oatmeal for food.
    * When the kids are done enjoying the farm, simply dump out in your garden and allow the worms to aerate your soil.

    Friday, April 22, 2011

    Ham Macaroni Salad Recipe

    Super-delicious way to use up your leftover hard boiled eggs and Easter ham.

    4 cups cooked elbow macaroni (about 1.25 cups uncooked)
    1 cup cooked cubed ham
    7 oz cubed cheddar cheese
    3 hard boiled eggs, chopped
    1 small onion, chopped fine
    1 cup chopped dill pickles
    1/2 cup celery, chopped fine
    1 T dijon mustard
    3/4 cup mayonaise

    Mix mustard and mayonaise. Then pour over remaining ingredients and stir to coat. Chill before serving.

    Monday, April 18, 2011

    Eggshells -- Great for gardening, seed-starting, and fun for kids!


    This project is very timely considering Easter is less than a week away. Use your leftover decorated or undecorated shells for this project.

    Be sure to check out my tips at the bottom for a kids project and using your cardboard egg cartons.

    Eggshell Seed Starters

    •eggshells, gently washed and dried
    •egg carton, top cut off
    •ice pick or awl
    •potting soil
    •seeds

    Gently break your egg open close to the top, ensuring that you save most of the egg for planting in. Clear out the contents, and carefully gently wash and dry it. Pierce the bottom with an ice pick or awl to provide a drainage hole. Set the eggshell in an egg carton.

    Fill each eggshell with soil, drop in 2 to 3 seeds and cover with more soil. Moisten the soil with a mist of water and place the egg carton in a warm, sunny location with good air flow. Keep the soil moist and turn the carton occasionally to ensure even growth.

    When it's safe to plant the seedlings outside, you can plant them in the ground -- eggshell and all.

    TIPS:
    Kids will have a great time dyeing or decorating shells, planting seeds in them, and watching the seedlings grow. Grass or wheat seeds work great for this. Use the seeding directions above, but make sure your potting soil is completely wet, not just moist.

    If you don't have eggshells, just use the cardboard carton itself as a seedling tray. Poke a hole in the bottom of each eggcup for drainage and follow the seeding directions above. When you're ready to plant them outside, just cut the eggcups into individual sections and plant them, cardboard and all. The cardboard will biodegrade as the plants grow.

    Crushed eggshells add valuable nutrients to your garden. If you have lots of eggshells (left over from Easter, perhaps) check out this info on using them in your garden: .