6833 Whitneyville Ave SE, Alto MI 49302 * (616) 868-6676 * CountryHarvestGreenhouse.com
Showing posts with label Projects. Show all posts

Saturday, January 25, 2014

Fairy Garden Inspiration


I saw this image on Facebook recently.  I have an obession with succulent plants, especially Hens & Chicks, and I adore minature things.  So this was definitely right up my alley.  I don't have directions to go along with it just yet.

Monday, September 9, 2013

Christmas Candy Sleighs

You'll Need:
Hot glue gun
1 standard Kit Kat bar
2 candy canes
10 Hershey bars (stacked 4, 3, 2, 1)
ribbon & a bow on top

Directions can be found here: http://ellynsplace.blogspot.com/2011/12/candy-sleighs.html

Frog Mosaic on a Rock

I don't have the directions for this project.  I saw it on Facebook today.  If I find directions I'll add them.  It looks like a really cute garden decoration.

Monday, April 8, 2013

DIY: Herbal Fire Starters

An all natural herbal fire starter.

Directions:

1. Just take the leftover twigs from your favorite herbs, such as rosemary, and snap them into lengths of 4 to 8 inches (your preference).

2. Stretch a length of approx. 1 to 2 feet of string/twine on your work surface.

3. Lay out a small bunch of the twigs perpendicular to the string.

4. Stretch/draw out several cottonballs and combine them to form a cotton piece or "rod" that stretches the length of the twigs.

 5. Smear or soak approx. 1 tbsp of coconut or other natural oil into the cotton thoroughly and lay upon the twigs.

 6. Lay another small bunch of twigs on top of the cotton.

 7. Draw the string up and around the twigs and cotton to bundle them into a single piece. Wrap several times going up and down the length of the bundle and tie.

 8. Use to start a fire or to drive away mosquitoes, freshen the air, clean an area of scent, etc!
 

Friday, March 29, 2013

DIY Easter Garden


Here's a fantastic Easter idea I just found online.  I've seen similar ideas, but this one is the most simple (and lowest in cost).  Even though Easter is upon us already, it is still a really fun idea to do over Spring Break.

You'll need:
Potting soil
a small terracotta flower pot
a large terracotta saucer
shade grass seed
twigs & string (to make crosses)
small stones
one large stone

Following example in the picture, fill part of the terracotta saucer with potting soil.  Place the small clay pot (the "tomb") on the dirt and pour more soil over top.  Gently pack it down.  Fill the area in front of the small pot with small rocks.  Place the large rock in front and off to the side of the small pot.

Create three crosses from the twigs and string.  Gently press into soil. 

Sprinkle grass seed generously on top of dirt, moisten with a spray bottle.  Keep the seed moistened by spritzing several times a day with spray bottle. Set it in a warm sunny location.

Grass should in 7-10 days.

Notes: You can use a plastic saucer and small pot.  If you use regular terracotta, I recommend you place something water-safer under the saucer.  Mold can build up under terracotta pots due to the moisture they retain, damaging the surface beneath the pot.

If you don't have nice little stones you can use, they are sold in home decorating departments at stores (often with the vases).

Tuesday, January 8, 2013

DIY: Shower Soothers

Ingredients
 
Water
Baking soda
Rosemary essential oil
Eucalyptus essential oil
Lavender essential oil
Silicone cupcake pan - a pan that makes shaped ones would be fun
Optional, lavender buds


Directions


1. Mix 1 cup baking soda with 1/3 cup water (mix in optional lavender buds)
2. Fill each cupcake cup approx. half full with the baking soda/water mixture
3. Add a few drops of each essential oil to the half filled cups
4. add more baking soda/water mix to essentially fill each cup the rest of the way
5. Bake for approximately 20 minutes at 350 degrees
6. Allow to cool
7. Add a few drops of each essential oil to the top and bottom of each cup's finished material
8. Store as is for up to 6 months or more
9. You can add a few drops of each essential oil directly before use for more scent strength
  

To use a shower soother, place it on the floor of the shower, in water but not directly under the stream if possible.


Makes a great gift!! To gift, place soothers in individual treat bags, tie with a bow and a cute label.  Or, put several in a small decorative Chinese takeout-style container.
 

Tuesday, April 24, 2012

Cactus Garden -- 2.0

My mid-winter blahs were staved off in January by creating a darling trio of cactus plantings:

But now, a few months later, I felt the inevitable desire for variety, plus a developing obsession with all kinds of succulent plants.  Thus, I took the plants from the trio of containers and combined them into this miniture garden with 5 kinds of succulents:


I find it to be too cute for words! 

You can make your own with a small container, rocks in the bottom for drainage, and a few small succulent plants.  Give it a try -- I think you'll like it!

Thursday, January 19, 2012

A Cup O' Cactus

Feeling the winter blahs? I know I am! When summer is a distant memory, and spring seems be running away from you, it's time for a little indoor greenery.

Windowsill gardens are the perfect idea for a little mid-winter burst of cheerful green. You can make a variety of windowsill gardens, anything from spring bulbs, plant cuttings, herbs, cacti, small tropical plants, and more.

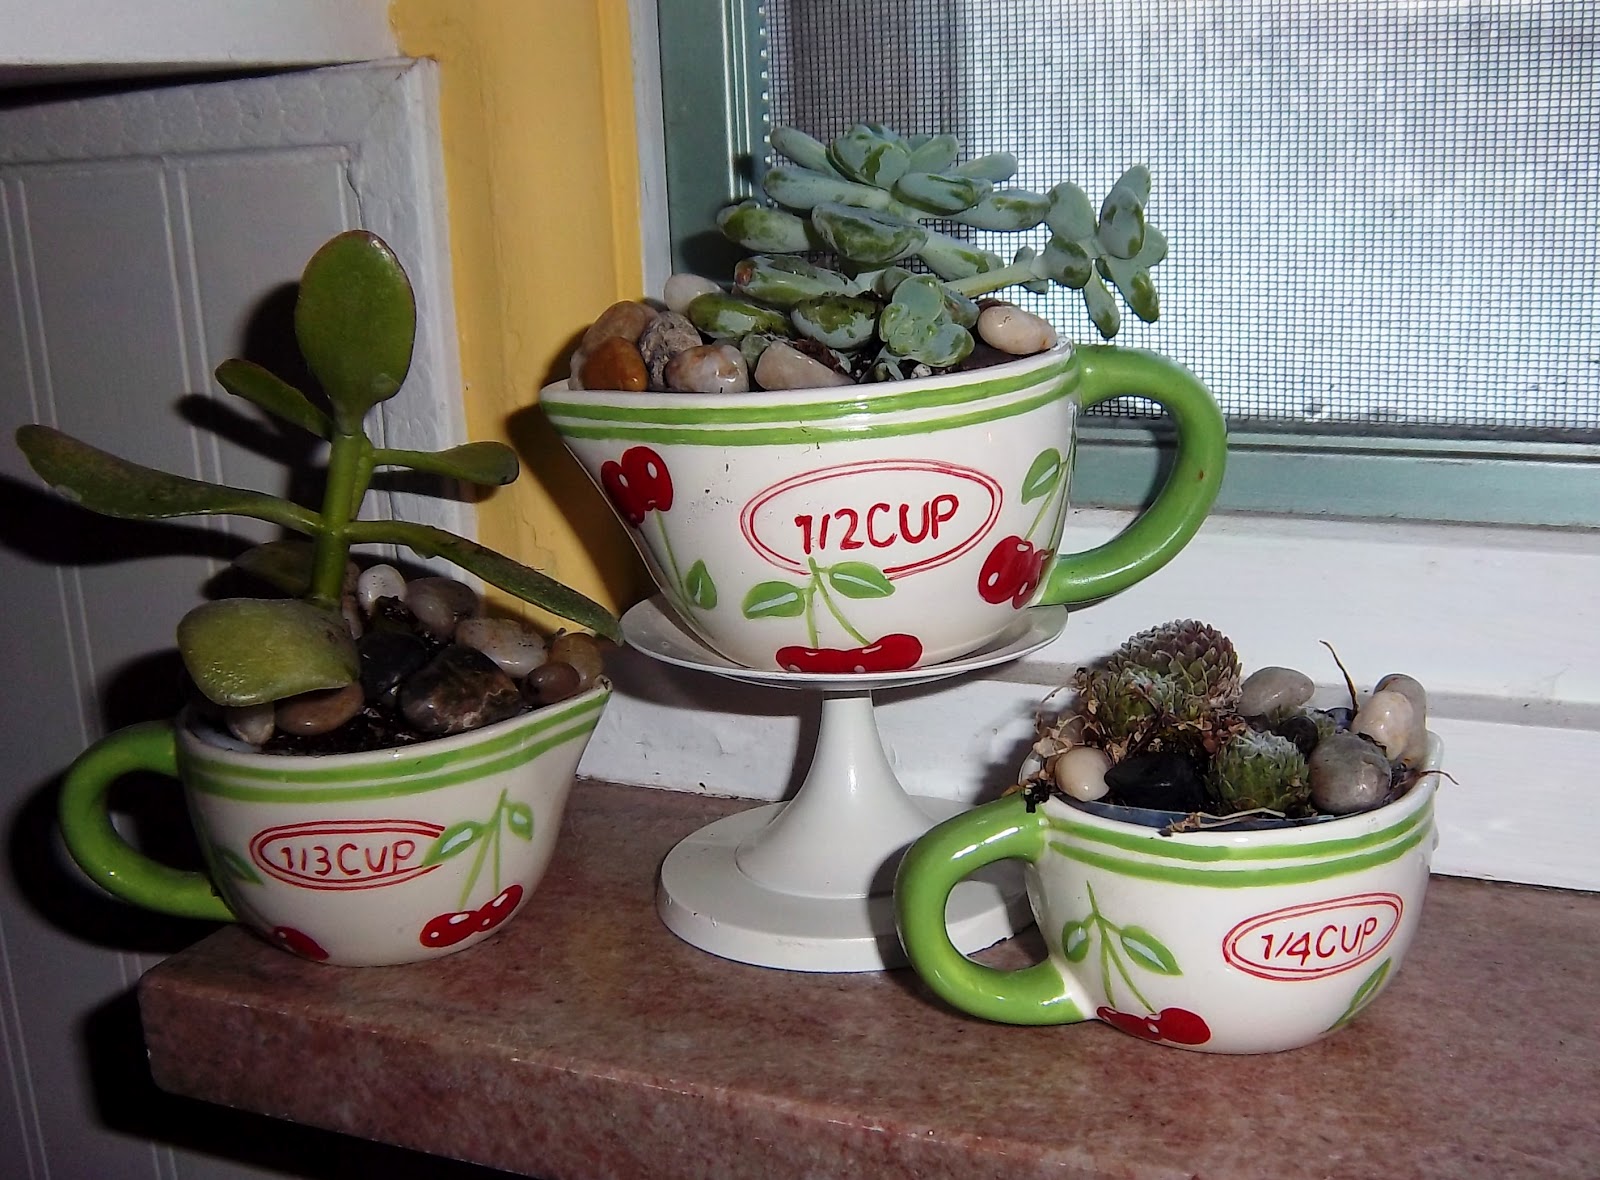
This year, I had a fun little project in mind involving some adorable ceramic measuring cups my mom had given me. I just knew they would be perfect to create a little windowsill garden vignette.


I think I was right. What do you think?

This is how I made it:

Gather:
- a small, sturdy dish (teacups would be cute)
- potting soil
- small plants (I used succulents, see note)
- plastic containers to line, if desired (I used Gladware and tiny plastic cups)
- small stones

1. If you choose, cut your plastic liner to fit your dish, so that the top of it is flush with the rim of your dish.

2. If it is deep enough, place a few stones in the container to aid with drainage. If it's not deep enough, that's OK. Just be careful not to over-water).

3. Fill the container part-way with soil, place your plant inside, and then gently pack soil around the plant.

4. If you like, place small stones on top of the soil around the base of the plant. They can help cover the rim of your plastic liner if it is showing.

Here are some other great examples: Desert in a Box, and Plants for the Sill.

Note on plant choice: You can use a variety of house (tropical) plants or herbs for this project. The main consideration will be the size of your container. If the container is too small, you won't be able to find a plant small enough. I was able to make my plants fit in very small dishes because I choose to make a succulent (cactus) garden. Succulents have very shallow roots, which allows them to be placed in small, shallow pots.

Sunday, May 1, 2011

Make Your Own Laundry Soap


Making your own laundry soap is much easier thank you might think -- and it's super-cheap! You just need a few ingredients and a food processor and you're good to go.


Ingredients:
- bar soap *see note below*
- Washing soda - not baking soda
- Borax

Tools:
- large container to store your soap
- Measuring cup
- Large mixing bowl
- Food processor

Making Your Detergent:
Your mixing ratio is simple: 1 bar of soap (or 2 cups soap shreds) to 1 cup Borax and 1 cup Washing Soda.

1. Grate your soap using your food processor or a hand grater. The finer the shreds, the better.

2. In large mixing bowl, combine 2 cups soap shreds with 1 cup Borax and 1 cup Washing Soda. Mix well.

3. Scoop your the soap mix into the food processor and use the chopping blade to finely pulse the soap mix. You want the soap shreds to mix well with the Washing Soda and Borax, and create a fine crumb-like mixture. Once finely processed, transfer to your container for storage.

4. Continue through remaining soap shred mixture in bowl, until all have been finely processed and well mixed with the Borax and Washing Soda. Transfer to your storage container as each batch is finely pulsed.

Using the Detergent:
When washing, use about 1/8 cup for medium loads and 1/4 cup for large loads. This soap does not bubble, so don't be alarmed when you don't see suds! Also, note the type of bar soap you use will have different stain-removal properties. Use Fels Naptha if you rely solely on your detergent for stain-fighting.

Soap Suggestions:
Ivory is a good choice, but I've been known to use whatever blows my hairback when I'm shopping. For the all natural route, you can choose Dr. Bronners bar soap, but at $4+ a bar, it is too rich for my blood. Other options are Fels Naptha (great for stain removal) or Zote.

Sunday, February 13, 2011

DIY: All-Purpose Spray Cleaner


This versatile all-purpose spray is great for kitchen counters, tables, sinks, floors, and more.

16 oz spray bottle (check dollar stores)
1 teaspoon Borax (found near speciality cleaners on the laundry soap aisle)
2 tablespoons vinegar
1/4 cup vegetable-oil based soap (like Dr. Bronners)
16 oz Hot Water
Few drops essential oil (optional)

Directions:

Add Borax to 16 oz of hot water in spray bottle. Cap and shake until Borax is dissolved. Add vinegar and shake. Then add soap and oil and shake.

Monday, April 27, 2009

Pizza Kits - a fun, fresh gift

Looking for a unique and useful -- and super-easy -- gift to give this spring? How about a "Pizza-to-Grow Kit", complete with tomatoes, spices and a box to hold it all in?

It's a great gift for kids to assemble and give, and it would make a fun, practical, and tasty present for teachers or for Mother's Day.

1) To start, visit your favorite local pizza joint and ask for a box (you may have to pay a small fee).

2) Then, purchase the fresh "ingredients" for your pizza -- lots of plants. Good choices for the pizza theme would be tomatoes, onions, green peppers, and herbs such as oregano and basil. For a fun play on words, include a flower plant to represent "flour" for the pizza dough.

3) You can transfer the plants into small pots (or styrofoam cups) if need be, then cut holes in the lid of the pizza box and place the plants in each.

4) For final touch, if you choose, include a gift certificate to the pizza place you got the box from.

A Pizza-to-Grow Kit is sure to be a big hit with recipients, and, assembling it will give your kids a chance to learn more about plants and the foods they make. For a great list of tomato, herb and flower options for your kit, visit our website at http://www.countryharvestgreenhouse.com/ and we'll help you find the plants for an awesome kit.

PS: Don't forget to let your kids plant their own pizza garden!

source: Family Fun magazine