In place of the lemon juice, you can drizzle a little balsamic vinegar over the asparagus. Add a little freshly grated Parmesan cheese for an extra touch.
Ingredients
1 lb asparagus spears (thick spears are best for roasting)
1-2 Tbsp olive oil
2 cloves garlic, minced
Kosher Salt
Freshly grated black pepper
Lemon juice
DirectionsPreheat oven to 400°F. Rinse clean the asparagus. Break the tough ends off of the asparagus and discard.
Lay the asparagus spears out in a single layer in a baking dish or a foil-covered roasting pan. Drizzle olive oil over the spears, roll the asparagus back and forth until they are all covered with a thin layer of olive oil. (Alternatively you can put the asparagus and oil in a plastic bag, and rub the bag so that the oil gets evenly distributed.) Sprinkle with minced garlic, salt, and pepper. Rub over the asparagus so that they are evenly distributed.
Place pan in oven and cook for approximately 8-10 minutes, depending on how thick your asparagus spears are, until lightly browned and tender when pierced with a fork. Drizzle with a little fresh lemon juice before serving.
Serves 4.

Saturday, June 15, 2013
Fresh Strawberry Lettuce Salad
 A very fresh and healthy salad that combines all the goodness of early season crops - strawberries, lettuce, and even green pepper.
 During the month of June, you can find Michigan Strawberries at Country Harvest Greenhouse.
Ingredients
1/2 cup fat-free creamy salad dressing/miracle whip
1/4 cup milk
1/4 cup white sugar
1/8 cup distilled white vinegar
1 tablespoon poppy seeds
1 head romaine lettuce, torn into bite-size pieces
1/2 red onion, sliced
1 cup sliced fresh strawberries
1/2 cup toasted pecans
1/4 cup red bell pepper, chopped
Directions
In a small bowl, mix together salad dressing, milk, sugar, vinegar, and poppy seeds. Refrigerate until ready to use.
Combine lettuce, onion, strawberries, pecans, and red bell pepper in a salad bowl. Toss with dressing.
Tuesday, May 21, 2013
Tomato Caprese Two Ways

May through September you can find homegrown tomatoes at Country Harvest Greenhouse.
CAPRESE SALAD
Makes a wonderful light dinner or a nice side dish.
Ingredients:
Large slicing tomato(es)
Basil leaves
Fresh mozzarella
Balsamic vinegar
Kosher sea salt
Olive oil
Directions:
Prep: Wash and pat dry your tomatoes and basil. Slice tomatoes and fresh mozzarella to similar thickness. Chiffonade the basil.
To assemble, layer tomatoes and mozzerella on a plate or platter. Sprinkle the basil on top. Sprinkle on sea salt to taste, then drizzle with balsamic vinegar and olive oil.
CAPRESE PARTY BITES
These tasty little skewers -- meant to eat all in one bite -- are always a fresh and flavorful hit at parties.
Ingredients:
Cherry or Grape Tomatoes
Basil Leaves
Fresh Mozzarella
Balsamic Vinegar
Kosher Sea Salt
Olive Oil
Long toothpicks or short skewers
*Note: Quantities of each ingredient depend on the number of skewers you want to make. You will need equal parts of each, unless you'd like to go crazy and mix up the recipe a little.
Directions:
Prep: Wash and pat dry your tomatoes and basil. Cube fresh mozzarella to similar size as your tomatoes.
Next, chop off the end of each tomato. You're just looking to provide a flat surface so that the little skewers will stand upright on your platter when you serve them.
To assemble, first place a mozzeralla cube, then a basil leaf, and end with the tomato, with flat side facing away from the basil leaf.
Sprinkle with sea salt, then drizzle with olive oil and balsamic vinegar.
Sunday, April 14, 2013
Cinnamon Butter
Super-easy, yet still impressive fancy spread. Perfect for parties, or just enjoyment at home. Perks up rolls and toast, sweet potatoes -- pretty much anything!
Ingredients:
1 stick of butter, softened
1/4 c powdered sugar
1/4 c raw honey
1 Tablespoon cinnamon
Directions:
Mix well and store in fridget in a container with a tightly sealed lid.
**We carry local, raw honey at Country Harvest Greenhouse.
Ingredients:
1 stick of butter, softened
1/4 c powdered sugar
1/4 c raw honey
1 Tablespoon cinnamon
Directions:
Mix well and store in fridget in a container with a tightly sealed lid.
**We carry local, raw honey at Country Harvest Greenhouse.
Monday, April 8, 2013
DIY: Herbal Fire Starters

Directions:
1. Just take the leftover twigs from your favorite herbs, such as rosemary, and snap them into lengths of 4 to 8 inches (your preference).
2. Stretch a length of approx. 1 to 2 feet of string/twine on your work surface.
3. Lay out a small bunch of the twigs perpendicular to the string.
4. Stretch/draw out several cottonballs and combine them to form a cotton piece or "rod" that stretches the length of the twigs.
5. Smear or soak approx. 1 tbsp of coconut or other natural oil into the cotton thoroughly and lay upon the twigs.
6. Lay another small bunch of twigs on top of the cotton.
7. Draw the string up and around the twigs and cotton to bundle them into a single piece. Wrap several times going up and down the length of the bundle and tie.
8. Use to start a fire or to drive away mosquitoes, freshen the air, clean an area of scent, etc!
Friday, April 5, 2013
Apple, Arugula & Endive Salad (Curly Endive)

This salad packs a punch of flavor with the endive and the peppery arugula, sweetness of the dressing and fruit, and the tangy goat cheese.
Ingredients:
1/4 cup olive oil
2 tablespoons apple cider vinegar
1 tablespoon orange juice
1 teaspoon honey
Dash of salt
1/4 cup pecans
2 heads of curly endive, chopped
1 cup arugula
1 apple, sliced thin
1/4 cup dried cherries or cranberries
1/4 cup goat cheese, crumbled (optional)
Directions:
To make dressing: In a small bowl, whisk together the oil, vinegar, juice and honey. Season with salt.
In a small sauté pan, toast the pecans over medium heat. Allow to cool.
Mix together the endive, arugula, apple and cherries (or cranberries) in a medium-size bowl. Toss with enough dressing to coat. Top with the pecans and goat cheese (optional).
Sautéed Swiss Chard with Parmesan

Fresh, young stalks can be used raw in salads, while older, larger stalks are best served cooked or sautéed. The bitterness will fade with cooking.
Chard is a spring harvest plant and is one of the more hardy leafy greens, with a harvest season typically lasting longer than kale, spinach or baby greens.
Ingredients:
2 tablespoons butter
2 tablespoons olive oil
1 tablespoon minced garlic
1/2 small red onion, diced
1/2 cup dry white wine
1 Tablespoon fresh lemon juice, or to taste
2 tablespoons freshly grated Parmesan cheese
1 bunchSwiss chard, stems & center ribs cut out & chopped together, leaves coarsely chopped separately
salt to taste
Directions:
Melt butter and olive oil together in a large skillet over medium-high heat. Stir in the garlic and onion, and cook for 30 seconds until fragrant. Add the chard stems and the white wine. Simmer until the stems begin to soften, about 5 minutes. Stir in the chard leaves, and cook until wilted. Finally, stir in lemon juice and Parmesan cheese; season to taste with salt if needed.
Friday, March 29, 2013
DIY Easter Garden
 Here's a fantastic Easter idea I just found online. I've seen similar ideas, but this one is the most simple (and lowest in cost). Even though Easter is upon us already, it is still a really fun idea to do over Spring Break.
You'll need:
Potting soil
a small terracotta flower pot
a large terracotta saucer
shade grass seed
twigs & string (to make crosses)
small stones
one large stone
Following example in the picture, fill part of the terracotta saucer with potting soil. Place the small clay pot (the "tomb") on the dirt and pour more soil over top. Gently pack it down. Fill the area in front of the small pot with small rocks. Place the large rock in front and off to the side of the small pot.
Create three crosses from the twigs and string. Gently press into soil.
Sprinkle grass seed generously on top of dirt, moisten with a spray bottle. Keep the seed moistened by spritzing several times a day with spray bottle. Set it in a warm sunny location.
Grass should in 7-10 days.
Notes: You can use a plastic saucer and small pot. If you use regular terracotta, I recommend you place something water-safer under the saucer. Mold can build up under terracotta pots due to the moisture they retain, damaging the surface beneath the pot.
If you don't have nice little stones you can use, they are sold in home decorating departments at stores (often with the vases).
Saturday, March 2, 2013
Pina Colada Jam
 |
| Image Souce: Taste of Home |
Ingredients:
2 1/3 cups crushed pineapple (about 1 med)
1/3 cup coconut rum (or coconut water)
3 Tbsp classic pectin
1/2 tsp butter or margarine
3 1/3 cups granulated sugar
1/4 cup shredded coconut, coarsely chopped
Directions:
PEEL and core pineapple. Coarsely chop pineapple, and then crush with a potato masher. Measure required quantity of crushed pineapple and remaining ingredients for your recipe; set aside.
Place crushed pineapple in a large stock pot. Pour coconut rum or coconut water over pineapple and stir. Stir in pectin. Add butter/margarine to help reduce foaming.
Bring to a full rolling boil. Then mix in sugar. and coconut. When it returns to a full rolling boil, boil hard for 1 minute exactly.
Ladle into hot, sterilized jars with ¼ inch headspace. Wipe rims. Add heated lid. Screw on ring, making it finger tight. Process in boiling water bath for 10 minutes. Makes 4 half pints.
Here's a second option with slightly different ingredients:
(follow the same steps for making the jam)
Pina Colada Jam 2.0
3 cups crushed pineapple
½ cup orange juice
¼ cup lime juice
½ cup coconut rum
2 cups sugar
3 tablespoons Ball flex-batch Classic pectin
Tuesday, January 15, 2013
Happy Dog Treats

2 c whole wheat flour
1/2 c all purpose flour
1/4 c cornmeal
1/4 c sunflower kernals, finely chopped
1/4 c molasses
1/4 c milk
1 tsp salt
2T oil
2 eggs, beaten
Mix all ingredients, adding more milk if needed to make dough firm. Roll out onto floured surface to 1/2 inch thickness. Use any shape cookie cutter to cut out biscuits. Bake on an ungreased cookie sheet at 350 degrees for 30 minutes or until lightly toasted. To make biscuits harder, leave in oven with the heat turned off an hour or more.
Notes:
Notes:
- I didn't use sunflower kernals, I think I threw in some oatmeal instead
- I added some peanut butter
- I added some peanut butter
Tuesday, January 8, 2013
DIY: Shower Soothers
 |
Water
Baking soda
Rosemary essential oil
Eucalyptus essential oil
Lavender essential oil
Silicone cupcake pan - a pan that makes shaped ones would be fun
Optional, lavender buds
Directions
1. Mix 1 cup baking soda with 1/3 cup water (mix in optional lavender buds)
2. Fill each cupcake cup approx. half full with the baking soda/water mixture
3. Add a few drops of each essential oil to the half filled cups
4. add more baking soda/water mix to essentially fill each cup the rest of the way
5. Bake for approximately 20 minutes at 350 degrees
6. Allow to cool
7. Add a few drops of each essential oil to the top and bottom of each cup's finished material
8. Store as is for up to 6 months or more
9. You can add a few drops of each essential oil directly before use for more scent strength
To use a shower soother, place it on the floor of the shower, in water but not directly under the stream if possible.
Makes a great gift!! To gift, place soothers in individual treat bags, tie with a bow and a cute label. Or, put several in a small decorative Chinese takeout-style container.
Saturday, December 22, 2012
Homemade Jelly Candies

Note: this recipe takes some time, so be sure to plan ahead!
Ingredients
2 - 3 oz pkgs flavored jello (not sugar free)
2 packets unflavored gelatin
1 1/3 cup applesauce
1 tsp lemon juice
2 cups sugar
More sugar for coating candy, about 1/2 to 1 cup
Making the jelly:
Spray a 11x7 pain with nonstick spray. Put in fridge to chill.
Combine all ingredients in a sauce pan. Let sit 1 minute. Then, bring to a boil over medium heat, stirring often. Boil 1 minute, stirring the whole time.
Pour immediately into prepared chilled pan. Refrigerate for 4 hours.
Cutting the jelly:
After 4 hours, remove from fridge, and sprinkle sugar on the surface of the jelly, gently spread to coat. Run a knife along edges to loosen jelly (wet knife if needed). Gently pull up from pan (I found a small metal spatula helps).
Turn out onto a surface that has been coated in sugar. I've found my large plastic cutting board works great. Just make sure it's coated in sugar to prevent sticking.
Sprinkle plenty of sugar in the bottom of the 11x7 pan you just pulled the jelly from.
Now, either cut into cute shapes with little cookie cutters, or use kitchen shears (or a knife) to slice into little cubes.
Toss cubes in sugar to coat all sides. Cut and coat all pieces of the jelly and place black in 11x7 pan. You can also place spaced out on a cookie sheet if you want to.
One last step:
Leave jelly candies sitting in pan on your counter, uncovered, for 8 hours or overnight. Then, store them sealed.
Tips:
- Using 2 packages of the same flavor of jello will provide a more intense flavor. Mixing will muddle the flavors more.
- Try using flavored applesauce. I combined cherry jello and cinnamon applesauce. The cinnamon wasn't too strong, but you could taste it.
- There are tons of jello flavors! Have fun and get creative.
- This makes a fantastic gift -- people will be impressed because homemade jelly candies are not as common as cookies or fudge, for instance.
Monday, September 17, 2012
Out of This World Apple Preserves
 The lemon keeps this sweet, chunky jam fresh-tasting. It reminds me of apple pie or applesauce. It's really just perfect, and seriously out of this world good!
I made mine with Honey Crisp Apples, but you can use any kind.
6 c. chopped, peeled & cored apples
1 c. water
1 T. lemon juice
1 package pectin
4 c. sugar
1/2 c. thinly sliced lemon
2 t. nutmeg
Combine apples, water, and lemon juice in a large non-reactive pot. Cover and simmer 10 minutes. Add in 1 package of pectin. Stir and bring to a boil. Add sugar and lemon. Stir until sugar is dissolved. Bring to a boil. Boil hard 1 minute, stirring constantly. Remove from heat and stir in nutmeg.
Ladle into prepared jars, leaving 1/4 inch head space. Process 10 minutes in hot water bath. Makes 6-7 half pints.
New to canning? You CAN do it! Ball makes it really easy -- go here to learn more.
Monday, August 13, 2012
Favorite Things: Mrs. Wages Seasoning Mixes
 It's no secret around these parts that I have really jumped into canning these past couple of years. I love preserving produce from our garden and making tasty treats for my family: spiced peaches, salsas, pizza sauces, applesauce, pickles ... and, of course, jams! Jessica's Pantry at the store is filled with a wide variety of my jams. But it's my basement shelves that see the true bounty.
My not-so-secret weapon for preserving a flavorful harvest: Mrs. Wages seasoning mixes. The easy-to-follow directions and flavorful seasonings take a lot of time and guesswork out of making fantastic canned goods. Directions for immediate eating or preservation by refrigeration-only, freezing or canning are all provided on the package. For the beginner like me, Mrs. Wages seasonings make things easier as you grow accustomed to the canning and preserving process.
So far, I we have tried Mrs Wages Pizza Sauce, Medium Salsa, Spiced Peaches, and Refrigerator Pickles and my family has loved each! I am a huge fan of the pizza sauce and made sure to can two batches this year since we ran out last year and I was bummed.
You can find the seasonings at your local grocer (for me, that's Meijers), right along with the plethora of canning products available this time of year. Or, you can shop Mrs Wages online store. Prices seem pretty comparable - especially when you consider shipping costs. (Though if you go here and scroll to the bottom they do have some specials going on.)
Enjoy and happy harvesting (and preserving!).
Saturday, July 21, 2012
Two Impossibly Easy Dips
My family has come to know me as the dip queen. No chip, no veggie stick, no vanilla wafer should go undipped. And so, I have added a line of dip mixes to Jessica's Pantry at Country Harvest Greenhouse. However, the dips I'm sharing don't start with a seasoning mix -- instead, look to the canned jam section of Jessica's Pantry.
Berry Delicious Dip
- 1 cup Triple Berry (or other fruit) jam
- 1 cup marshmellow creme
Mix well -- a mixer will be needed -- and voila! Instant delicious fruit or cookie dip. You can choose the jam flavor you want and you can alter the ratio of jam-to-creme based on your tastes.
Hot Pepper Dip
- 8 oz cream cheese, softened
- 1 cup hot pepper relish
Mix well. Creates a creamy, savory dip with a hint of sweet and a hint of heat. Serve with crackers or veggie sticks.
Monday, June 4, 2012
Strawberry Rhubarb Jam
 It's that delightful time of the year when rhubarb and strawberries are in abundance. Here's a tasty way to make use of the bounty!
 Recipe yields 6 half pints
2 c. crushed strawberries
2 c. chopped rhubarb
6 Tbs pectin powder
1/4 c. lemon juice
5 1/2 c. sugar
Before you begin, prepare your hot water bath, jars, and lids. Ball Canning provides an excellent step-by-step for this.
Next, prepare and measure out all ingredients. (When it comes time to add the sugar, you will want to be able to dump it right in.)
Combine strawberries, rhubarb, pectin and lemon juice in a large saucepot. Bring to a boil over high heat. Once a full boil is reached, add the sugar, stirring until dissolved. Return to a rolling boil. Boil hard for 1 minute, stirring constantly. Remove from heat.
Skim foam if necessary. Ladle hot jam into hot jars, leaving 1/4 inch headspace. Adjust 2-piece caps. Process 10 minutes in boiling water canner.
TIPS:
- Use a liquid measuring cup for strawberries and lemon juice to ensure accuracy in measuring.
- Fresh lemon juice is best, but not vital.
- You may want a potholder in your hand when you stir the boiling jam - it bubbles & spits.
- A dab of butter added in during the boiling will reduce foam.
Recipe source: Ball Blue Book Guide to Preserving
Image source: Kraft.com
Saturday, May 5, 2012
Favorite Things: Meet My Very Good Friend Phil (odendron)
 I thought it would be fun to do a series on my favorite things - plants, recipes, and otherwise. To launch this series, I present to you my best bud Phil.
Phil is a philodendron tropical plant, or as I like to call it - a "No-Kill 'Um" plant.
Which means -- just as it sounds -- it is very, very difficult to actually kill one of these hardy plants. Outside of jade plants, philodendrons are the most fantastic, forgiving plants it has been my great pleasure to know.
 Not only can they survive in low light and with sporadic watering, they are fantastic climbers and prolific viners and it's quite fun to wrap their vining branches in and around your decor.
 Another fun thing you can do: snip a few philodendron vines and keep them in water indefinitely. They make lovely windowsill gardens or bookshelf decorations.
Trust me, novice and forgetful plant-keepers will find philodendren to be a fun and easy way to green up your living space. I hope you stop by Country Harvest Greenhouse and pick up your very own "No Kill 'Um" and give it a try!
Tuesday, April 24, 2012
Cactus Garden -- 2.0
My mid-winter blahs were staved off in January by creating a darling trio of cactus plantings:
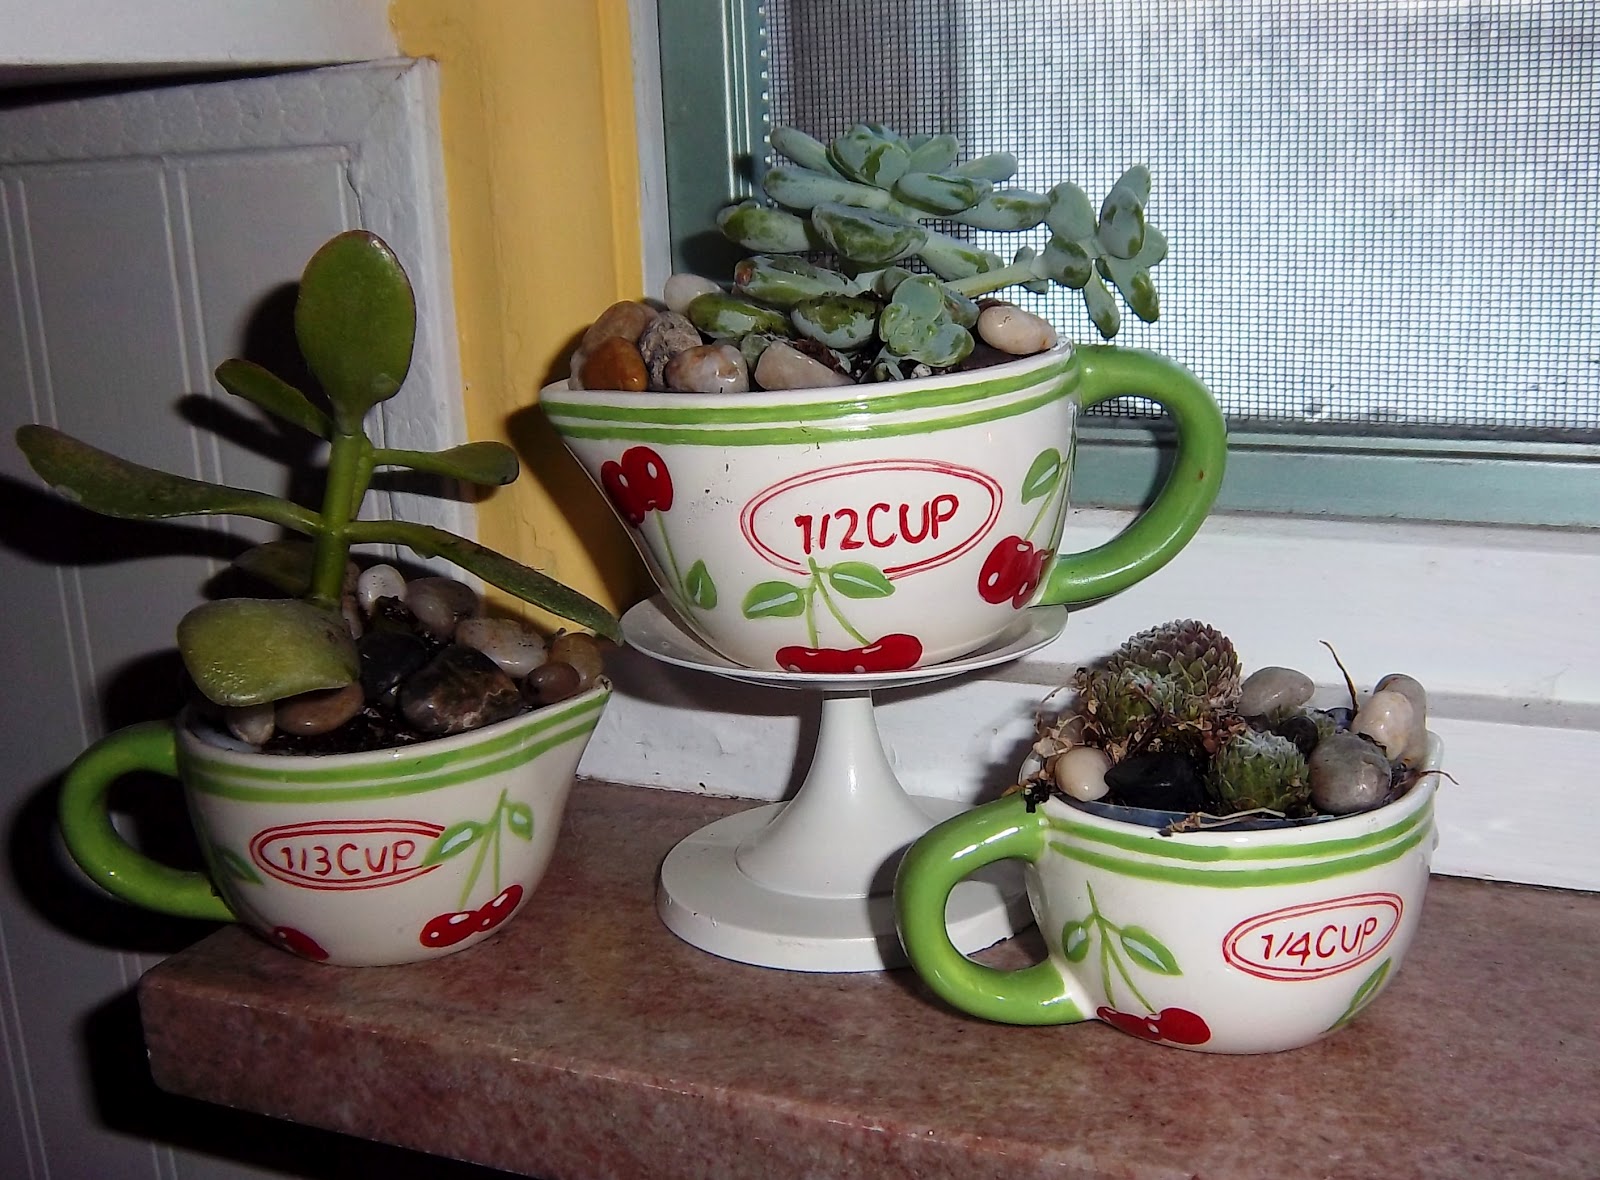

But now, a few months later, I felt the inevitable desire for variety, plus a developing obsession with all kinds of succulent plants. Thus, I took the plants from the trio of containers and combined them into this miniture garden with 5 kinds of succulents:

I find it to be too cute for words!
You can make your own with a small container, rocks in the bottom for drainage, and a few small succulent plants. Give it a try -- I think you'll like it!
Friday, April 20, 2012
Roasted Kohlrabi


Ingredients
4 kohlrabi bulbs, peeled
1 tablespoon olive oil
1 clove garlic, minced
salt and pepper to taste
1/3 cup grated Parmesan cheese
Directions
1. Preheat an oven to 450 degrees F (230 degrees C).
2. Cut the kohlrabi into 1/4 inch thick slices, then cut each of the slices in half. Combine olive oil, garlic, salt and pepper in a large bowl. Toss kohlrabi slices in the olive oil mixture to coat. Spread kohlrabi in a single layer on a baking sheet.
3. Bake in the preheated oven until browned, 15 to 20 minutes, stirring occasionally in order to brown evenly. Remove from oven and sprinkle with Parmesan cheese. Return to the oven to allow the Parmesan cheese to brown, about 5 minutes. Serve immediately.
Monday, March 5, 2012
Kitchen Storage
 The spice cabinet can be one of the most frightening and fantastic places in the kitchen.
 It used to be that I'd open the door and haphazard stacks of containers of all shapes and sizes filled with a wide array of spices would all beg for my attention. The chaos was a tad overwhelming! I have 25 to 30 spices (and I'm not even that adventurous of a cook -- no cayenne and no curry, for example) and that is a lot to wrangle in one small space.
Finally frustrated with the mess of spice bottles of every shape and size, I recently invested in a storage system that I'd already been using elsewhere in my pantry: the ever-handy and versatile mason jar.
The jars offer a consistent size and a stable surface for stacking, plus their airtight lids preserve freshness and keep out pantry pests.
Here's what I did:
Tip: You can find mason jars at garage sales and second-hand stores. But they are pretty scarce and it's probably easier to by a package of them from the store.
Subscribe to:
Posts (Atom)